
I've got many HDE Jobs under my belt now, all of them TVCs ranging from bigger 16 Day TVCs to smaller two day jobs. I've run different versions of Codex Device Manager (V5.0 and V5.1 BETA) in different versions of macOS (Mojave 10.14 and Catalina 10.15) on different computers (MacBook Pro and Custom Built 'iMac Pro' Hackintosh) with different Cameras and Codex Hardware (Alexa Mini, Alexa LF and Alexa Mini LF). I've been in touch with ARRI and Codex about HDE Issues as well as liaising with Pomfort and Imagine Products about software specific problems and discrepancies. With that experience on hand, I have decided to put together this comprehensive post on all things HDE. I trust it will serve as a useful tool for you.
ESSENTIAL INFO
Rather than re-hashing all of the information that ARRI and Codex have provided, I would recommend that you take a read of their resources first before diving into this blog post.
For ARRI's explanation of HDE you can reference their FAQ and select HDE / High Density Encoding from the dropdown:
For Codex's explanation of HDE you can reference their dedicated HDE Page, the Spiderman Case Study is well worth a read:
As a very brief summary, HDE is a new recording format introduced by ARRI and Codex in 2019. It applies compression to the ARRIRAW Recording Format, this is done on your computer while offloading, not on the camera. Think of this compression in the same way that you ZIP a file on your computer. The computer processes the data and compresses the files, meaning they become smaller in size and require less storage capacity on your hard drives (HDDs) or solid state drives (SSDs). HDE works like zipping a file in terms of file integrity, the ARRIRAW becomes smaller in size without any quality loss. HDE Files actually do not exist until the compression is done, just like a ZIP File doesn’t exist until the compression is done and the .zip file is created. Given that the HDE Compression is done while offloading the data, this means that the files do not exist until they are offloaded. They do exist as normal ARRIRAW on the camera media but they do not exist as ARRIRAW HDE, this is a seperate version of the footage that is created while offloading.

On average, the compression offered by HDE equates a 40% data saving. I found it to be around 35% but I have certainly seen instances of it compressing the data by 50%, calling it a 40% saving seems fair. This means that on average, 1TB of ARRIRAW becomes 600GB of ARRIRAW HDE, that's a massive data saving, especially over the course of a longer job. This in turn translates to cost savings. On average SSD Storage is around $300-$350 AUD per terabyte, if you can decrease the amount of SSD Storage required you will save 40% on your drive costs. I’ve found that offloads are also quicker meaning you will save on labour. This is a win for everyone.
With that summary in mind and the knowledge you gained from the ARRI and Codex explanations, let's dive in.
MY FIRST HDE JOB
In November / December 2019 I did a two week commercial using an Alexa Mini LF shooting 4.5K ARRIRAW. I was warned in advance that the Director/DP liked to shoot a lot, given we were shooting 4.5K RAW I made the call to utilise HDE on this specific job. It was no trouble getting the decision to shoot HDE over the line. The producer and director both trusted my judgement and were confident in my ability to problem solve should we encounter any issues.
I was running a 2018 MacBook Pro on macOS 10.14.6 (Mojave) with my Data Deluxe System and utilising Codex Device Manager 5.0 BETA (5.0.0-05325). Film Drives built some Custom SSD RAIDs for the job, our main set of drives were 2x 16TB SSD RAIDs. Should we shoot over 16TB, our overflow drives were a set of 2x 8TB SSD RAIDs.

The 16TB SSD RAIDs consisted of 4x 4TB SATA SSDs. I didn’t want to set them up as a 4 Bay RAID 5 as I’d lose too much capacity, 16TB was already pushing it which is why we had the overflow drives. I also didn’t want to set them up as a 4 Bay RAID 0, yes, that would have given me great speed throughput but if one of the four SSDs had a problem or failed, we would lose that entire backup. Instead I opted for a nice middle ground. I created two partitions for each 16TB SSD RAID, Partition 01-1 was an 8TB RAID 0 made up from two of the four 4TB SSDs, Partition 01-2 was an 8TB RAID 0 made up from the remaining two 4TB SSDs.

I did tests prior to shooting to determine how the drives would perform. When setup as a 4 Bay 16TB RAID 0 Partition my speed tests using Blackmagic Disk Speed Test were 1180MB/s Write and 1375MB/s Read. When setup as 2x 2 Bay 8TB RAID 0 Partitions, each partition performed at 915MB/s Write and 985MB/s Read. The speed difference between 2x 2 Bay 8TB RAID 0 Partitions averaged to be 26% slower than the 4 Bay 16TB RAID 0 Partition, given the added safety of having two partitions this felt like a good trade-off to me.

This TVC was a travel job, we set off around Australia with our first few days of shooting being up north in Darwin and Kununurra to do some aerial work. Given the nature of working in a helicopter only the Director/DP, the Gimbal Technician and the Helicopter Pilot could be up in the air. In terms of data management, this meant they would shoot a whole lot while in the air, land back at base at the end of the day and hand over many full cards of footage. This is where my work began.

At the end of shoot day one we’d shot close to 1.4TB of ARRIRAW, this is not all that much and actually served me well as my first on-job execution of HDE. I had a bunch of different software on-hand to try out and see which served me best. Given this was Shoot Day 01 of an 11 Day Shoot spread over two weeks, it was important to get it right now so that the rest of the job would be as smooth as possible.
The software I was using is listed below:
Shotput Pro 2019.3.2 (Current Version as of 23/11/19)
Silverstack (Current Version as of 23/11/19)
Offload Manager (V1.1.1 Build 27)
Hedge (19.5α Build 787)
As regular ARRIRAW the card came in at 958GB. If you factor in the 40% data saving of HDE, I was expecting the ARRIRAW HDE version of this card to be 575GB. Offloading 575GB to my drives that perform at 915MB/s Write, my estimate was that an offload and verify would take 30-40 Minutes. I did the same offload of Roll H001 as HDE on each software, below you will find what I have noted:
Shotput Pro 2019.3.2
Shotput Pro 2019.3.2 took 55:56 Minutes to offload and verify. It then got stuck on ‘Generating Reports’ for 30 Minutes at which point I quit the software. In the past I have found image sequences to take a long time when it comes to generating a PDF Report in Shotput Pro as it tries to take a frame grab for each and every frame to put into the report. Whenever dealing with image sequences and using Shotput Pro I disable PDF Reporting and only use TXT Reporting, that is what I had enabled in this instance yet I still had a massive lag come reporting time. The final byte count in Finder when using the Get Info Function of macOS came in at 579,512,806,159 bytes.

One thing worth flagging is that during the offload, Shotput Pro gives you a readout of ‘Bytes to Read’ and ‘Bytes Read’. After the offload had finished and Shotput was onto the verification process there was a mismatch between these two values. I wasn’t sure what to make of this at the time but it did raise a red flag with me as normally these two numbers match.

Silverstack
Silverstack took 35:21 Minutes to offload and verify. This was pleasing as it was the first offload that sat within my estimated range. The final byte count in Finder was 579,512,891,062 bytes. One thing worth noting is a warning message within Silverstack when I initiated a HDE Offload. A screengrab of the warning message is below.

The wording wasn’t 100% clear to me but what I believe it is trying to say is this:
‘The HDE files that we will create are different from the ARRIRAW Files you are copying from, we don’t know exactly what the file output will be as things will be discovered as the offload takes place, note this and double check that all clips that exist on the original card are copied to your destinations’.
I was already operating with a great deal of scrutiny when it comes to HDE so it’s nice to have a warning that reminds you to be extra pedantic.
Offload Manager
Offload Manager took 20:02 Minutes to offload and 19:10 Minutes to verify. The final byte count in Finder was 579,512,806,159 bytes. This was a touch slower than the offload and verify operation in Silverstack, I suspect this stems from the difference in how each software processes tasks. Silverstack works file by file, H001C001 will be offloaded then verified, then Silverstack will move onto H001C002 and repeat the process. Offload Manager will offload all of the clips first, then do a verification pass running the checksum operation. I was pleased with the performance of Offload Manager as it sat within my estimated range.
Hedge
Hedge took 50:47 Minutes to offload and give the tick of approval. I then studied Activity Monitor and watched Hedge perform additional reads and deeper verification in the background for 11:14 Minutes. In total I would call the complete Hedge offload and verify 62:01 Minutes. The final byte count in Finder was 579,512,806,159 bytes. For more information on how Hedge’s Verification differs to that of Shotput Pro, Silverstack and Offload Manager I suggest you check out my blog post on ‘What Is The Fastest Offload Software?’.
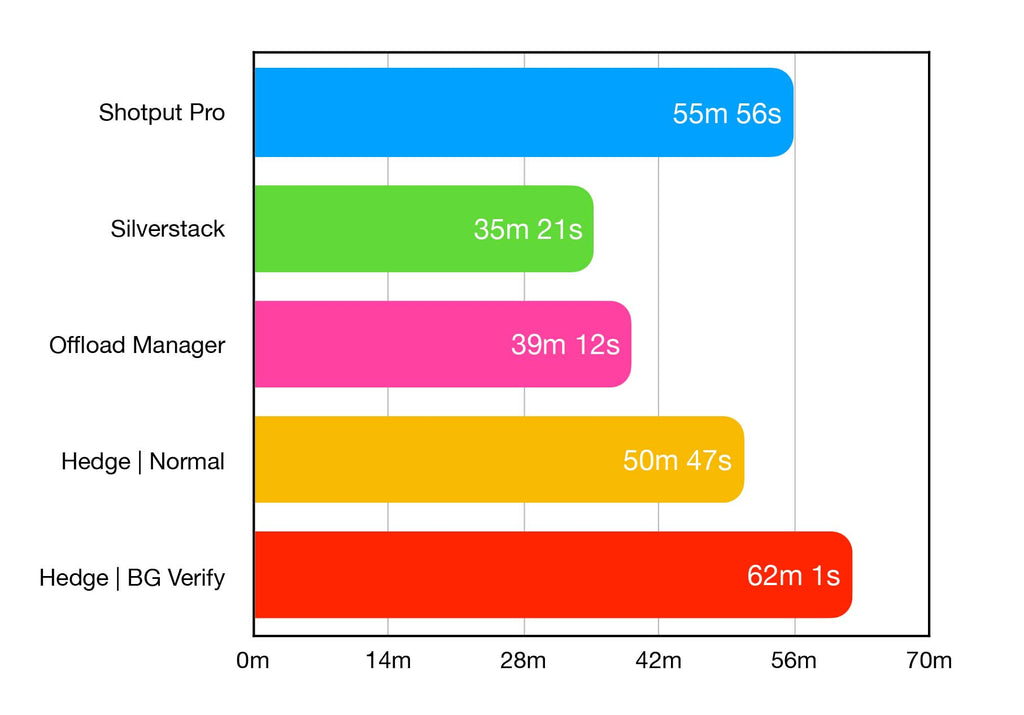
When you compare the results this is how it looks for speed:
Shotput Pro - 55:56 Mins
Silverstack - 35:21 Mins
Offload Manager - 39:12 Mins
Hedge - 62:01 Mins (50:47 Mins if you don’t count the background verification)
When you compare the results this is how it looks for byte size:
Shotput Pro - 579,512,806,159 bytes
Silverstack - 579,512,891,062 bytes
Offload Manager - 579,512,806,159 bytes
Hedge - 579,512,806,159 bytes
It should be noted that my estimate for this card was 575GB of ARRIRAW. All software offloads came in at 579GB which is close to the estimate. HDE turned this card from 958GB of data to 579GB of data. This is a 379GB saving which equates to 39.5%, very close to the specced 40% claimed by ARRI.
Speed is speed and faster is usually better, obviously there is some very different processing going on between each software that equates to better performance in one as opposed to the other. This could be on the individual software level and in how they implement the ARRIRAW SDK provided by ARRI.
What concerned me more was the mild difference in byte size. Codex Device Manager works to compress and create the .ARX Files from the .ARI Files and the Offload Software copies the newly created HDE FIles to your destinations. In theory, all software should process HDE the same. That means that the HDE Version of H001C001 that is copied with Shotput Pro should be identical to the HDE Version of H001C001 copied by Hedge. In my case this was true for Shotput Pro, Offload Manager and Hedge, but the Silverstack offload had a slightly different byte count. This could be caused by differences in the binary and metric calculation of data or it could be a hidden file created by macOS.
I was working under a high degree of caution as HDE was a new format for me, I couldn’t put that difference in bytes found in Silverstack down to coincidence and I didn’t have time to investigate further. Given the report generation issues I had with Shotput Pro and the burden on my mind when it came to factoring in the Hedge background verification, it seemed that Offload Manager was the best choice. Offload Manager also offered faster performance than Shotput Pro and Hedge in my tests, with that in mind I decided that Offload Manager was the best choice for the remainder of this job.
I felt good about Offload Manager but there was still one thing that bothered me about HDE. The ARRIRAW Files for H001 were 958GB, the HDE Files for H001 were 579GB, the only tool in the workflow for ensuring that the HDE Files were indeed a compressed version of the ARRIRAW Files was the offloading software. What if the software made a mistake? Very unlikely but it’s a check I generally like to implement in all of my offloads. Typically I will offload and verify with a software, then I use ‘Get Info’ in Finder to check the byte size of all destinations and the original, if they match great, that’s a second check, if there is a mismatch I look closer and determine why there is a mismatch in the byte count. I feel this is a great way to double check your offload software and there isn’t anyway to do this with HDE. I have developed a workflow for dealing with HDE which employs a reasonable way to work around this problem which I will detail in a seperate blog post.

After committing to Offload Manager, the rest of the aerials went off without a hitch. The software performed reliably and at consistent speeds. I felt good once I had developed some logical tests to crosscheck my HDE workflow, all was happy days. This took me up to Shoot Day 03, we wrapped aerials and sent our H Camera Body back to the rental house. We flew to Adelaide and started the next leg of our shoot which entailed a much bigger crew than the splinter aerial unit. Along with new crew, we had a new camera body which was the start of many HDE headaches.
HDE ISSUES
We added A Camera to our lineup which was another Alexa Mini LF Body prepped in Melbourne and brought over to Adelaide. The first scene on the A Camera was a sunset shot which meant a very similar situation to the helicopter work. We’d prep, shoot nothing, then the light would be right and we’d shoot a lot. Most of my work would be done on wrap. I chatted with the 2nd AC and we were able to get a camera reload in while changing setups which was very useful.
I got back to my data station which was setup off set and inserted the first card into the Codex Reader. No response. No lights, no flashing, no sounds. What was going on here? I know my computer works as I had used it perfectly fine the day before with the H Camera. What was new in this setup, the camera body, the cards and the card reader. The easiest thing to troubleshoot was the card reader so I swapped out the USB-C Cable to see if that would help, no change, I tried it on different USB-C Ports, no change, I tried it with no other devices connected, simply power and card reader just encase it was a bus power issue, still no change.
While I was troubleshooting they had wrapped on set so I went back to collect the second card of the day and a spare card to use for troubleshooting. While I popped out to collect this I thought I’d leave the first card plugged into the reader just encase it needed a little bit of time to fire up. To my surprise, when I got back to the data station after collecting the other cards from set, the first card had mounted. Weird.
I proceeded with a HDE Offload via Offload Manager and all seemed to be going fine. Just as the offload was coming up on being done it threw an error. The error message was ‘Unexpected Abort During Write. (110)’. To me this meant that either the card or one of the drives ejected themselves while the offload was happening. What I would normally do in this instance is clear the original failed offload and try again. When I tried the HDE Offload again it failed with the exact same error message, I was watching it this time, there were no disconnects, both drives and the card were connected the entire time.

My next step of troubleshooting was to eject all devices, reboot the computer and try again. When the computer booted I plugged in both drives, they showed up no worries, I ran a speed test on them with Blackmagic Disk Speed Test, they were working as expected. I plugged in the card reader with the first card A001, same as last time it didn’t mount right away but I knew it eventually would. After three minutes of waiting the mag mounted, this delay was strange, the card would be inserted and there would be literally no response at all, then suddenly the lights would flash, the fans would spin up and the card would mount to my desktop. Now that I was good to go I tried the offload again. Same place, the error occurred. After three failed HDE attempts it was time to shift my approach, I couldn’t keep wasting productions time as I was well and truly into overtime at this point.
I had a friend encounter a similar issue a few weeks prior on a different job, he never got to the bottom of it and his solution was to do a regular ARRIRAW Offload instead so that’s what I tried. I went to Codex Device Manager and disabled HDE, the card still took a while to mount but it mounted as a normal ARRIRAW Partition. I offloaded the card and there were no issues. Given the suspect behaviour of this card I paid very close attention when performing my Quality Control (QC) Checks. Went I was satisfied that all was safe and sound I moved onto the second mag of the day. I re-enabled HDE in Codex Device Manager and inserted A002, it mounted right away. I proceeded with the HDE Offload and it worked as expected.

A001 failed in all sorts of ways, but A002 worked exactly the same as all of the cards from H Camera. What this said to me is that there was a problem with the first card. This was good news, I had suspected the problem may have been with the card reader and we were very rural, getting a replacement sent to Outback South Australia would prove quite difficult. For the moment I quarantined that card intending not to use it again, I then reached out to Codex and ARRI to tell them of what happened and see if there was any help that they could offer. Thus the situation evolved.
TWO ISSUES, NOT ONE
After extensively chatting with Codex and ARRI it became clear that I was dealing with two seperate issues, not one.
Issue #01
Codex Compact Drives Taking Several Minutes to Mount
Issue #02
Failed HDE Offloads
I initially thought these two issues went hand in hand, the team from Codex pointed out otherwise and in my testing I found it to be true. I had instances later on in the job where I would have a card exhibit the slow mount issue but then perform a successful HDE Offload. After other extensive testing I discovered that the slow mount happens only after the card has been used by the camera. If I have already waited through the slow mount and read files from the card, then I eject it, then re-insert it, the card will mount quickly as normal. Note that this is different behaviour to that first A001 Card that I had problems with. If I clear the card on the computer, put it back in the camera, format the card in the camera, shoot on it and then insert it into the computer the slow mount will occur again. It seems to just happen on that first mount after each format on camera for specific cards.
Codex informed me they were aware of the slow mount issue and were working to reproduce and understand what is going on. I ended up narrowing down the slow mount issue to just two cards from our kit, Iater on when the job finished I believe these were sent back to Codex for testing and replaced with new units.
As for the second issue, failed HDE offloads, that requires a bit more explaining, let’s dive in.
FAILED HDE OFFLOADS
Codex informed me that when a clip fails to offload as HDE it is likely a CRC Checksum Issue. What does that mean? Every single frame of ARRIRAW that gets recorded has a CRC Checksum which corresponds to that individual frame. A checksum will compare one value of data to another, giving an all clear when the data matches. In this instance the ARRI Cameras are checking that the data created by the camera sensor matches the data that gets written to the camera card. This way we ensure the data doesn’t change while being internally transmitted from the sensor to the card. This CRC Checksum between the sensor and the card is often called an Image Essence Checksum as it works to make sure what we see while shooting is what gets recorded to our card.

If the CRC Checksum that is created by the camera sensor has one value and the CRC Checksum created by the camera card has another value we have a mismatch. This means what the sensor captured is not what has been written to the card. Codex informed me that the Codex Device Manager V5.0 BETA Software used a fast-fail method, this means that if a clip has a CRC Mismatch on any frame it will fail to offload as ARRIRAW HDE.
Let’s think about this. We were shooting at 25fps, so if we shot a clip that ran for 40 Seconds that would be 1000 Frames and thus 1000 CRC Checksums of the Image Essence. If any 1 out of those 1000 checksums had a mismatch I can’t offload that clip as HDE. Say I shot 10 Clips of the same length on that card, that’s 10,000 Frames and thus 10,000 CRC Checksums of the Image Essence. If any one of those ten thousand checksums had a mismatch I can’t offload that card as HDE.
Codex informed me that a CRC Mismatch can occur when the camera loses power during recording. I can understand how this may happen in rare circumstances on set. On this job the camera never lost power while recording but I still had CRC Mismatches on 14 Rolls out of the 55 Rolls that we shot on A Camera. Given the high frequency of the issue perhaps there was a firmware issue with the camera. I sent the camera logs to ARRI and the software logs to Codex which helped to troubleshoot things on their end but I didn’t hear if there were any problems camera side. Regardless, we were in the middle of a job in outback Australia with a bunch of travel, not an ideal time to update your camera’s firmware especially without a backup camera body, thus we had to persist.
What did that mean for me? Well, ideally I’d like to find a way to determine if a particular card had a CRC Mismatch before I started offloading it. As it currently stood I would start a card as a HDE Offload and the offload would process. If a HDE Mismatch was present it would fail towards the end of the offload, that would be my first indication of a problem. Then I’d eject the card, turn off HDE, re-insert the card and offload it as regular ARRIRAW. The time wasted processing a HDE Offload that was destined to fail wasn’t ideal, for full 1TB cards this could equate to 20-25 Mins of time lost. So I tried to find an alternate way.
Method #01
ARRI Meta Extract GUI
Codex informed me that ARRI Meta Extract is capable of running CRC Checks on clips so I decided to give that a go. You have two options when using ARRI Meta Extract, you can tailor it to just focus on CRC Checks or you can set it to process all metadata. I tried both and in both instances the software gave me accurate CRC Check information.
For a successful clip it would display something like:
’Finished (CRC Check): Verified 1035/1035. Mismatch: 0’
For a failed clip it would display something like:
’Finished (CRC Check): Verified 4839/4841. Mismatch: 2’
The software shows you this information visually and also outputs a .csv file for each clip. If you were to interpret the data for the failed clip you would see that the clip has 4841 Frames, 4839 Frames were okay but two frames had issues, thus the whole clip fails the CRC Image Essence Check.

While running this is useful, practically it didn’t help me. A process I trialed was to insert a card into my computer, then to run a CRC Check via ARRI Metadata Extract. If the CRC Check came back good I would proceed with an ARRIRAW HDE Offload, if the CRC Check Failed then I would proceed with a regular ARRIRAW Offload. The problem was that running a CRC Check via ARRI Meta Extract on the entire card took the same time as offloading the entire card with Offload Manager.
Say I have a card that takes 30 Mins to offload as HDE, I found that if I offloaded that same card as regular ARRIRAW it would take 50 Mins to offload. There are a few ways this could play out:
Option #01:
CRC Check in ARRI Meta Extract (30 Mins) -> CRC Fail -> Regular ARRIRAW Offload in Offload Manager (50 Mins)
Option #02:
CRC Check in ARRI Meta Extract (30 Mins) -> CRC Good -> HDE Offload in Offload Manager (30 Mins)
Option #03:
Failed HDE Offload in Offload Manager (15-20 Mins) - > Regular ARRIRAW Offload in Offload Manager (50 Mins)
Option #04:
HDE Offload in Offload Manager (30 Mins)

Option 01 and Option 03 represent when a HDE Offload Fails. Option 02 and Option 04 represent a successful HDE Offload. For both outcomes I was better off time wise to try and fail a HDE Offload in Offload Manager than I was to run a CRC Check with ARRI Meta Extract followed by the appropriate offload. This led me to my second option.
Method #02
ARRI Meta Extract CMD
This is the same ARRI Meta Extract Software except it runs in the command line rather than having a graphical user interface. I thought that maybe some of the front end processing slowed down the CRC Checks that the software was performing. This wasn’t the case. The CRC Checks took the same amount of time in the CMD Version (Command Line) as it did in the GUI Version (Graphical User Interface).
This is a PDF Export of what you can expect in macOS Terminal when using ARRI Meta Extract via the Command Line:
I also read in some documentation that a specific ARRIRAW CRC Check Tool exists. This being a specific software tool that is seperate from Meta Extract. I couldn’t find this tool online and did chase it up with ARRI but never ended up getting my hands on the tool.

Method #03
Offload Manager HDE Fail
As eluded to above, this is where I would run a HDE Offload first and monitor to see if it fails due to a CRC Mismatch. If it fails then I would cancel the HDE Offload and start a new offload of the regular ARRIRAW Footage. If it didn’t fail then great, things are working as they should and I have a super speedy offload. What I didn’t like about this method is that it’s a wildcard, it introduced a bit of anxiety into my workflow as I was constantly hoping that the offload would work. However I did find that I was able to make this method more efficient, the downside was that it meant more hands on work and thus extra time.
Rather than using the standard view in Offload Manager to check the progress of my offload, you can right click the offload that is in progress and select ‘Show Job Details for This Offload’. In this detailed view you can monitor the offload and the verify progress on a clip by clip basis. This meant that if I had a card that had 49 Clips on it and the clip with the CRC Mismatch was C023, rather than waiting until C049 to finish copying to discover the issue I could now monitor the offload in real-time and see the issue occur as the software processed C023. Once I see that error I cancel the HDE Offload and start a new offload as regular ARRIRAW. Using this method I reduced wasted offloading time by around 50-60% at the cost of being close to the computer during the copy process. A worthy tradeoff.

You might be wondering why I don’t process cards in segments with partial offloads. Say I have a card with 20 Clips and only one clip fails the CRC Check. In theory I could process 19 Clips as HDE and just that one failed clip as regular ARRIRAW. Yes, this is a possibility but it feels messy. Editorial was fine with me doing whole cards as ARRIRAW and whole cards as ARRIRAW HDE depending on the CRC Mismatch Issue, but once you start chopping cards up and processing them clip by clip the risk of making a mistake increases, not to mention the time cost of parsing which clips were good for HDE and which clips were not.
I was leaving a digital note on the drives detailing each card that had a CRC Issue and thus needed to be processed as regular ARRIRAW. Given that HDE was very new at the time I wanted to make sure editorial understood what was going on. Should the drives be used down the line, be it in a few months or many years in the future, it’s important to have a clear paper trail outlining anything that deviates from normal. I don’t want a call in 7 Months time from someone asking why some clips have HDE at the end and why others don’t, best to leave clear details of what happened and why with an explanation of what you did to solve the issue.
For the rest of the job I utilised Method #03 detailed above. Whenever I had a successful HDE Offload it was a relief as I had many HDE fails even up until the last shooting day. I always just hoped that the issue didn’t occur on the last card of the day, meaning extra time to finish the days work and thus less sleep as we were working on fairly tight turnarounds.
I came out of that job with the opinion that HDE is great but not perfect. The data, time and cost savings are fantastic but some issues are yet to be ironed out meaning it requires a lot of baby sitting for error free offloads. However, HDE continued to be developed having it’s bugs squashed and issues sorted. I finished that job in December 2019, by March 2020 my experience with HDE had certainly improved.
CODEX DEVICE MANAGER V5.1 BETA
In Feb 2020 Codex realised the long awaited V5.1 of Codex Device Manager as a Public Beta. I say long awaited as this version added support for macOS 10.15 (Catalina) which many users had been desperate for. Another crucial improvement introduced in this version of the software is how Codex handles the CRC Mismatch Issue. Rather than the fast-fail method of V5.0, V5.1 allows clips that have CRC Mismatch Issues to passthrough the HDE Pipeline and be offloaded as ARRIRAW HDE. Codex Device Manager will log the CRC Mismatch Errors and note them in a report. Codex have told me that the CRC Error Handling algorithm will flag the CRC Mismatch and throw an error to let you know, you can then proceed with the offload and the issue will be detailed in the Codex Log Files. Offload Software such as Silverstack, Offload Manager, Shotput Pro and Hedge will be able to implement the error logging and reporting, how it gets implemented is up to the developer as they all function slightly differently.
One other difference between V5.0 and V5.1 that is noteworthy is that V5.0 used OSXFUSE as it’s virtual file system while V5.1 uses X2XFUSE as it’s virtual file system. I was initially cautious of this but it has been confirmed that X2XFUSE is inclusive of the OSXFUSE Source Code. This means that you still have the same reliable foundation that you’ve known for years, just with some new tweaks built specifically by Codex. Having their own version allows Codex to tailor the virtual file system to the specific needs of Device Manager and the hardware it supports. If you wanted to have a version of OSXFUSE installed for different purposes yet still run X2XFUSE for Device Manager you can, having two versions that can co-exist is useful when dealing with compatibility issues and troubleshooting.
When the V5.1 Update landed I upgraded my systems to macOS 10.15.3 (Catalina) and processed to refresh my system with all up to date software. Since then I have utilised HDE on many TVCs and haven’t encountered any major problems. I’m feeling confident that Codex have ironed out the issues that plagued me on my first HDE Job. The software is still in Public Beta so I’m sure things are still being refined to make them as bulletproof as possible. The next section of this article will help you to understand any quirks of HDE that you may come across while working with it on set.
INTERESTING QUIRKS OF HDE
As with any new technology there are new processes that need to be managed and quirks that need to monitored. HDE isn’t immune to this and I’d like to run you through some of the things I’ve noticed to date that are worth keeping an eye on.
The 'drserver' Process
When running any data management process I always have iStat Menus running on my Mac. It’s a great portable tool that allows you to quickly and easily glance what your computer is doing, from CPU Load to Temperature. When I was performing HDE Offloads I noticed one process that was always present when looking at iStat Menus, ‘drserver’.
The process ‘drserver’ is Codex’s behind the scenes brain. It seems to be handling all of the data throughput from the camera card to the computer, which of course is being mediated by the Codex Card Reader. Codex have stated that HDE is CPU dependant. The extra compression that HDE introduces needs to be processed and the computer’s CPU is what does all of the legwork.
During my first HDE Job I kept a keen eye on my computer’s processes as it was offloading each HDE Card. No surprise, ‘drserver’ was top of the list when looking at CPU Usage. This is expected given the CPU Heavy HDE Processing. What did surprise me was that the Internal GPU (Radeon Pro 560X in my 2018 MacBook Pro) was pretty much maxed out in terms of Memory and Processor. When I looked at which processes were using the iGPU it was an Adobe Helper, Dropbox, ScreenFlow and ‘drserver’. Why was ‘drserver’ using my GPU? It was meant to be solely CPU Dependant. I contacted Codex to try and get to the bottom of it. The problem was classified as a resource allocation issue but it’s underlying cause was unclear. Codex assured me that their software doesn’t use GPU Rendering for HDE Files and they suspected the problem may be related to a hang in CRC Handling which was part of the CRC Mismatch Issue that I was experiencing on that job.

Remember, on that job I was using Codex Device Manager V5.0 BETA. With V5.1 of Codex Device Manager a few of the potential causes for this issue should be resolved. With V5.1 a new error handling process was introduced which will report and log errors in a more meaningful way, if you did see ‘drserver’ utilising your GPU the team at Codex will be in a better position to understand the cause of the problem. There is also a hidden configuration option that prevents ‘drserver’ from accessing any GPU resources, this can only be enabled by a Codex Engineer via a remote troubleshooting session.
With that in mind, I’d advise you to keep an eye on ‘drserver’ while you are offloading. See how much CPU it’s using and if it’s tapping any GPU Resources at all. If there is something that seems out of the ordinary please touch base with Codex Support.
Offload Speeds | HDE vs. Regular ARRIRAW
During my first HDE job I had a chance to compare offload speeds between a HDE Offload and a Regular ARRIRAW Offload. You’ll recall that my SSD RAIDs performed at 915MB/s Write and 985MB/s Read when tested with Blackmagic Disk Speed Test.
Regular ARRIRAW
When offloading Regular ARRIRAW I could see Offload Manager reading around 930MB/s from the Codex Mag and writing 1800MB/s to my two SSD RAIDs. When verifying, Offload Manager would be reading between 1800MB/s - 2700MB/s. These numbers line up when you assume a base offload speed of 900MB/s. The verify process varied pending if Offload Manager was reading from my two destination drives or two destination drives plus the original camera media.

Please note from the screen grabs above the CPU Usage. When doing a regular ARRIRAW Offload or verify the CPU Usage is very low.
HDE ARRIRAW
When offloading HDE ARRIRAW I could see ‘drserver’ reading around 780MB/s from the Codex Mag and Offload Manager writing around 900MB/s to my SSD RAIDs. When verifying, ‘drserver’ was reading around 780MB/s from the Codex Mag and Offload Manager was reading around 1800MB/s from my SSD RAIDs, this is in line with what I would expect for verification of two destination drives plus the original camera media.

Please note from the screen grabs above the CPU Usage. When doing a HDE ARRIRAW Offload or verify the CPU Usage is very high.
Offload Speeds | Comparison
What shocked me about these results is that a HDE Offload seemed slower solely when looking at sheer data throughput. The Codex Mag could be read at 780MB/s via HDE while the same mag could be read at 900MB/s via regular ARRIRAW.
In real life HDE performing slower was a non-issue as the amount of data and time saved by HDE (40%) outweighed the data throughput handicap we could observe. This means that offloading 600GB at 780MB/s is faster than offloading 1000GB at 900MB/s. Still what was causing the handicap? This is where thermal load comes into play. Sometimes it feels like technology’s biggest battle is with heat dissipation. When something gets too hot it’s performance will throttle to stop heat from destroying it’s components. This is commonly referred to as ‘thermal throttling’, it happens with SSDs and CPUs.
Offload Speeds | Thermal Throttling
So which was maxing out here? The thermal load on the SSD RAIDs can be ruled out as each drive performed at 900MB/s for both regular ARRIRAW and HDE ARRIRAW. It comes down to the SSD within the Codex Mag or the CPU within my MacBook Pro. I didn’t have any external thermometers on hand to measure the Codex Mag or Reader, nor did I have an internal readout on it’s temperature. However I did have a readout on my CPUs Temperature which can be loosely observed via iStat Menus in the screenshot below. The highlighted top left number is indicative of the CPU Proximity Temperature Sensor, which is sitting at 97°C. The CPU that is being used within my MacBook Pro has a T Junction of 100°C, this means that the max temperature the CPU can hit is 100°C, once it hits this number the performance of the CPU will be throttled. The system will only throttle the CPU when the MacBook Pro can not cool the CPU effectively. The inability to effectively cool itself is a well known issue for MacBook Pros, particularly in the newer style USB-C MacBook Pros. I suspect that is what happened to me.

To create HDE Files the ARRIRAW Files need to be compressed, this compression is done by the CPU. If your CPU is throttling itself because it's too hot, it won't be able to perform at max speed, thus the HDE Compression is slower. That is why we see slower read and write speeds when the computer is hot, the HDE is being compressed slower so there isn't as great of a need for data in and data out.
Sometimes we were travelling in cars doing data on the run on a hot day in Outback South Australia, if I didn’t have the car fully sealed, the laptop out of the sun and the air-con on full my offload speeds would plummet. Thermal throttling at it’s finest. Even when working in air conditioned offices, the CPU demand would be so high for sustained periods of time that the MacBook Pro couldn’t dissipate heat fast enough, hence the 900MB/s -> 780MB/s handicap detailed above. Based on this evidence and my experience using HDE on a MacBook Pro since, I conclude that thermals play a massive role when using HDE on-set.
My best advise is to always do HDE Offloads in an air-conditioned space. Where this isn’t possible, make sure you are in a cool place, in the shade with adequate airflow. Of course this issue is only prevalent when using a MacBook Pro, other systems like the Mac Pro and iMac Pro have much better heat dissipation and this thermal throttling will likely never become an issue for you.
If you aren’t using SSD RAIDs (900MB/s), your offloads will be capped out by the speed of the Regular SATA SSDs (500MB/s) or Regular SATA HDDs (130MB/s). When your speeds are capped by your destination drives the CPU doesn’t need to work as hard to process the HDE, thus the CPU only works at 40% rather than 90% and generates less heat meaning the thermal throttling problem won’t effect you.
To illustrate this, below is a screen grab from I a job I did in March 2020. We were using Regular SATA SSDs (500MB/s). Given that the computer can only write HDE Files to the SATA SSDs at a max of 500MB/s the CPU Speed needed to process the HDE is much less. You can see the CPU performing at around 40% and the CPU Temp is only at 73°C. This is vastly differently to the previous example using SSD RAIDs (900MB/s) where the CPU was performing at 90% and the CPU Temp was at 97°C.

CPU Load
There is one more thing to keep in mind when it comes to CPU and HDE. As previously explained, excessive heat will thermally throttle your CPU and thus your CPU’s performance. What else causes poor CPU Performance? Having a poor CPU! I’ve found that the 6-Core and 8-Core CPUs that are present in the 2018 and 2019 15"/16" MacBook Pros are adequate to keep up with Top-End HDE Offloading. Once you start dipping down to 4-Core CPUs in older computer’s I suspect the CPU Processing won’t be able to keep up with the speed of the Codex Mags or the SSD RAIDs making the computer the weak link in the chain. Please keep this in mind when assessing if your computer will be adequate for a HDE ARRIRAW Job.
ProRes HDE?
When shooting on an Alexa Mini or Alexa Mini LF you basically have two recording options, ProRes and ARRIRAW.
When you shoot ARRIRAW you can choose to enable HDE via Codex Device Manager. When HDE is enabled the mag will mount as ‘A013_hde’, when HDE is disabled the mag will mount as ‘A013’.
This toggle exists all of the time, so if you leave HDE Enabled in Codex Device Manager and insert a mag that contains ProRes Footage, it will show up as both 'A013' and ‘A013_hde’. Given it's a ProRes Card, the '_hde' indicates a ProRes HDE Format which actually doesn’t exist. Thus ‘A001_hde’ actually can not exist because there is no such thing as ProRes HDE. The actual footage displayed to the user is the same as you can see below, but the naming conventions are bound to cause some confusion.

I’m sure Codex will fix this in a future software update but in the mean time the best practice is be keenly aware of the format you are shooting. I’ve had jobs that bounce between ProRes and ARRIRAW and I was offloading the ARRIRAW as HDE. For circumstances like this I would know if a mag was ProRes or ARRIRAW. When it was ARRIRAW I would explicitly enable HDE via Codex Device Manager, when it was ProRes I would explicitly disable HDE via Codex Device Manager.
The toggle is accessed by selecting Codex Device Manager from your menu bar on macOS and clicking Preferences. From there you can checkbox HDE on or off. I always do this when no card is mounted to the computer.
It’s certainly annoying to manually toggle this option on a per card basis but in my eyes it’s better than getting confused and accidentally offloading a ProRes Mag with '_hde' file naming which suggests some form of Non-Existent HDE.
Codex Only for CFast
This last quirk is by far the most frustrating. Let me tell you how I discovered it. I was on a Car Job, we were alternating between Alexa Mini and Alexa Mini LF. The Alexa Mini was fitted on a tracking vehicle, it was shooting 3.4K ARRRIAW which I was processing via HDE. One morning they came back from the first run and had filled five 256GB CFast Cards. We had 7 Cards with the camera package, this meant until I offloaded and checked a card we only had two more cards to use with that camera, one of which was half full and still in the camera. The 1st AC had tried to get them to drop the cards to me sooner so I could start turning them around but they didn’t want to make the pitstop.
As soon as they returned to base I started offloading the smallest card based on info provided by the 1st AC. I was doing a HDE Offload using the Codex CFast 2.0 Card Reader. This was Day 4 of a 4 Day Job and up until that point the Codex Reader was fine, however on this morning something wasn’t quite right. The HDE Offload finished way quicker than expected and flagged an error. Given the time pressure I was under I didn’t have time to troubleshoot properly, I assumed it was an issue with the card reader and swapped in my Lexar CFast 2.0 Reader. To my surprise I wasn’t able to do a HDE Offload with this reader. To get things done quickly I just did a regular ARRIRAW Offload, I checked and cleared the card and sent it back out with the tracking vehicle. We had SSDs on hand which essentially saved us in this instance.
They were happy enough with the amount of cards they now had to get through what they needed to shoot, the pressure was off a little to get the remaining four 256 CFast Cards offloaded so I had a moment to properly troubleshoot. It seemed the issue with the Codex CFast 2.0 Card Reader was the USB Cable, I swapped it out and things worked fine for my CFast HDE Offloads. What bugged me is that I couldn’t use HDE with a Third Party CFast Reader, I tried many different cards with my Lexar Reader and each time I couldn’t get the HDE Partition to mount via Codex Device Manager.
A few weeks later I was helping a friend troubleshoot some HDE Issues via phone, they were shooting ARRIRAW on an Alexa Mini with CFast Cards. They wanted to use HDE but the rental house had only provided a SanDisk CFast 2.0 Reader with the kit. When they enabled HDE on the ARRIRAW CFast Cards, no dice, the partition wouldn’t mount. I flagged with them that I suspected they needed an actual Codex CFast Reader to use HDE which they enquired about to the rental house. In response the rental house then sent out an Angelbird CFast 2.0 Reader which uses USB-C. ARRI has endorsed Angelbird CFast 2.0 Cards as being suitable for the Alexa Mini so the hope was that a card reader from the same brand would work for HDE. Again, no luck. They could only access regular ARRIRAW files, not the ARRIRAW HDE Files.
This confirmed it for me. Codex Device Manager will only allow HDE ARRIRAW on an Alexa Mini when you use the official Codex CFast 2.0 Card Reader.

In one way it does make sense, the software is called ‘Codex Device Manager’, it manages Codex Devices. Lexar, SanDisk and Angelbird Products aren’t Codex Devices, thus Codex Device Manager doesn’t manage them which means HDE doesn’t work.
However, I find it quite disappointing. We live in a more transparent and open source world today than we did five years ago. To block a software feature because a user is utilising cheaper hardware doesn’t seem fair. Especially as third party card readers live in DIT or Data Wranglers Kits all the time, often as a spare because the Codex CFast 2.0 Card Reader can be cost prohibitive to them.
With that being said, it’s unclear if the HDE block is software or hardware based. Given the Codex CFast 2.0 Card Reader came out with the Alexa Mini in 2015 and HDE wasn’t released till 2019, it’s hard to believe that there would have been enough foresight to know that in four years time we’ll have developed an ARRIRAW Compression Feature (HDE) and that we’ll need a hardware component in the Codex CFast 2.0 Card Reader to ensure users can only use this future feature with Codex Hardware. It’s much more likely that the limitation is put in place via software. Codex Device Manager detects the CFast Reader, if it’s a Codex Reader HDE is given the green light, if it’s a Third Party Reader then HDE is blocked.
Of course this won’t effect you when using an Alexa SXT, Alexa LF or Alexa Mini LF as these all use a property Codex Mag and Codex Mag Reader, no third party options exist so you won’t have a problem. It’s just something that you should be aware of when using an Alexa Mini, CFast Cards and ARRIRAW.
CONCLUSION
I trust that this post has proven helpful to you, especially if you haven’t been hands on with HDE before. Please learn from my issues so that you can come onto set well equipped with knowledge that will assist you in dealing with HDE Problems swiftly and without stress.
If you have any questions or queries, please let us know in the comments section below!