
DEFAULTS
When macOS is freshly installed on your system Finder will conform to Apple's Default Settings. These settings are fine but they fit in with a minimalist approach to information which isn't ideal when your job is an astute attention to detail.
In the below image I have setup a 'Rushes Drive' and a 'Backup Drive' for the purpose of this tutorial. You'll always be backing up to at least two drives, preferably three. I keep my file naming conventions consistent throughout drives, the only naming that differs is when it's a different drive or different shoot day.

My questions to the above Finder Setup would be:
- How can I tell which Finder Window corresponds to which drive?
- How can I tell how much space is left on the hard drive?
- When dealing with camera media, how many items are in this folder?
You could check all of this is you use Get Info (Command + I) on the folder you are looking at. But this is time consuming and an extra process for you to complete just to get information that can be easily displayed. There must be a better way, thankfully there is!
OPTIMIZATION
PART 01
In order to fully optimize Finder you will need to download a handy piece of software. There is a free application for macOS called Onyx that serves as a tool for system maintenance as well as tweaking advanced user settings. Each version of Onyx is specifically built for different iterations of macOS. Please download the version of Onyx that is applicable to your OS. For this example I am using Onyx 3.4.9 for macOS High Sierra 10.13.6.
![]()
When you open Onyx it will run a few system checks, please click continue and allow it to complete this process. Once you are in, select the 'Parameters' Icon in the user bar which will take you to Advanced User Settings. From here select the tab labelled 'Finder'.

The key setting for our purposes here is under 'Misc. Options'. Please tick the checkbox next to 'Show the item path in the window title'.

You will get a pop-up box saying that Onyx needs to close and re-open Finder. Ensure no files are copying in the background and click continue.

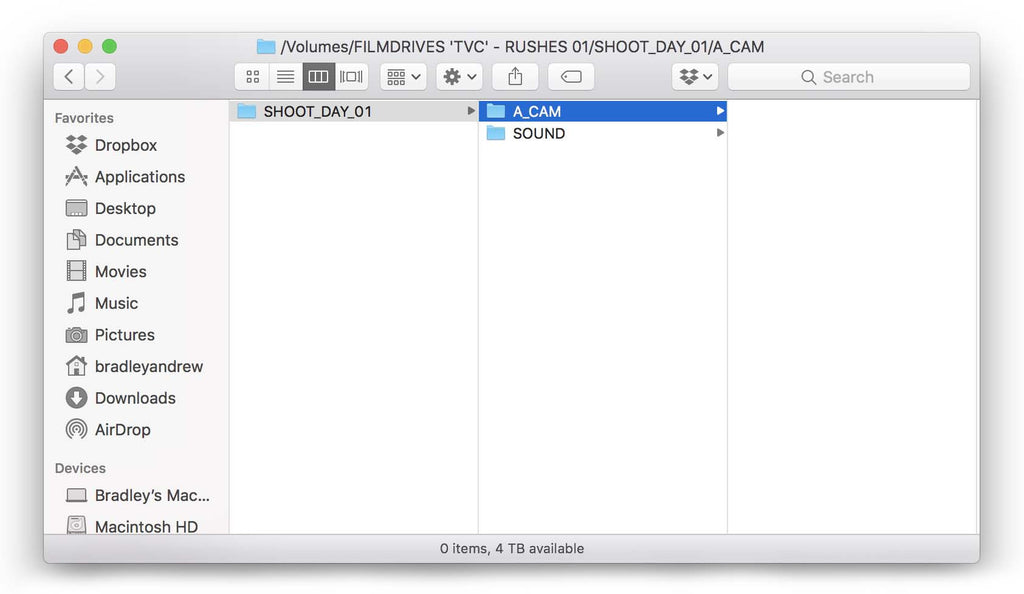
Now when you look at the exact same drives detailed above they will look like this:

The key difference is the Title Bar. Take a look at the A/B Comparison below:

Before the tweak with Onyx it just displayed the folder name, now it displays the full path of the folder. This means that you will always be able to tell exactly where the folder/file you are looking at is located, all in a quick glance.
This becomes super useful when you are working with multiple drives as offload destinations, all it takes is a mis-click and you'll wind up navigating to a different drive. As they all tend to follow the same file structure it isn't obvious what exact drive you are looking at. This is crucial when you want to ensure specific footage is copied to a particular drive. I often run Finder side by side with my data management software to act as a double check encase the software or a human error hasn't offloaded the footage to the destination that I intended. The more redundancies you have built into your data management process the more bulletproof your work will be.
OPTIMIZATION
PART 02
This second optimization doesn't require any 3rd Party Software. All you need to do is open any Finder Window, select 'View' from the top left Application Bar and select 'Show Status Bar'. This can also be toggled on/off with the keyboard shortcut 'Command + /'.

Once you have applied this tweak the Finder Windows that we were using above will now look like this:

Before you had no information, now you have the item count of the current folder as well as how much space is left on the drive you are looking at.
The item count is useful when checking camera cards, you've got 42 clips, Finder says 42 items in the folder that you are looking at which would be the folder your data management software has offloaded to. That's another double check method to make sure there hasn't been an issue anywhere else in your process.
The remaining space is helpful to see at a glance to ensure you're keeping track of exactly how much you have shot and how much you can still offload onto your current drives. Some days there is just an onslaught of data and you are constantly offloading, when your main priority is staying on top of cards as they come in, a quick look at this status bar is invaluable. It will inform you if you need to swap out to a new set of drives soon, or if you don't have a new set of drives to flag it with the Production Manager to ensure something can be sorted out before it's too late.
THE macOS ALTERNATIVE
There is an alternate option to 'Optimization Part 01' that was detailed above which doesn't require the 3rd Party Software 'Onyx'. I must acknowledge those who are well versed with Finder that may be asking 'What about the Path Bar?'.
As simple as displaying the Status Bar, you can open any Finder Window, select 'View' from the top left Application Bar and select 'Show Path Bar'. This can also be toggled on/off with the keyboard shortcut 'Option + Command + /'.
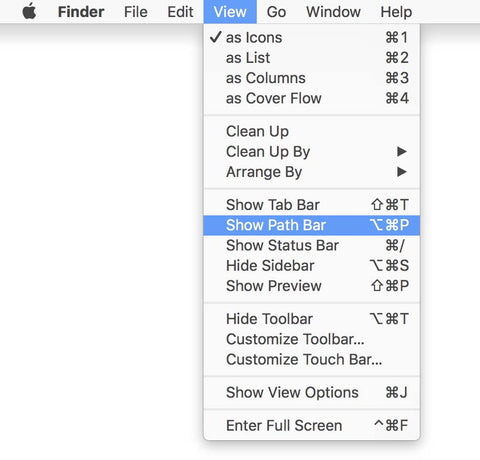
Once you have enabled the Path Bar the Finder Windows that we were using above will now look like this:

This may work for some users as it displays the current path in a more graphical fashion, see below for Onyx Method vs. macOS Method:

But for me I find that the 'Show Path Bar' Option takes up too much screen real estate, particularly when working on smaller screens like a laptop. I would much rather have my file path displayed in the title, the title is going to be there regardless, if I can hit two birds with one stone, that being title bar and path bar in one then that's a win in my book.
I also find that it can be too busy when combined with the Status Bar. There is a fine line between not enough information and too much information. I find the macOS Path Bar to be that fine line.

OTHER TWEAKS
Finder View
Some users may prefer to use a different Finder View. These can be accessed by opening any Finder Window, select 'View' from the top left Application Bar and select a View:

Alternatively you can use the View Icons which are located in the top bar of every Finder Window:
![]()
You can also use the keyboard shortcut Command + 1/2/3/4 to toggle between Views.
I prefer the Icons View as my default view for Finder. It allows your browsing to be more visual which I find useful when navigating through camera rushes in Finder. The downside is that you can only jump forward/back one folder at a time, this can be a pain for complex file structures with many layers of folders that you need to move through constantly. The back function can be accessed from the 'Back Button' in the top left bar of every Finder Window. If you'd like to use the back function more fluently you can use the keyboard shortcut 'Command + ['.
Occasionally I will flick to the Columns View in Finder. This remedies the navigation problem when you are deep in complex file structures. It also allows for a list view of files which is useful when looking at image sequences or an overview of 50+ Clips within a single folder.
Force Filename Extensions
Some files don't display their extension by default. There is an option that will force all files viewed in Finder to display their filename extension. To enable it navigate to Finder -> Preferences.
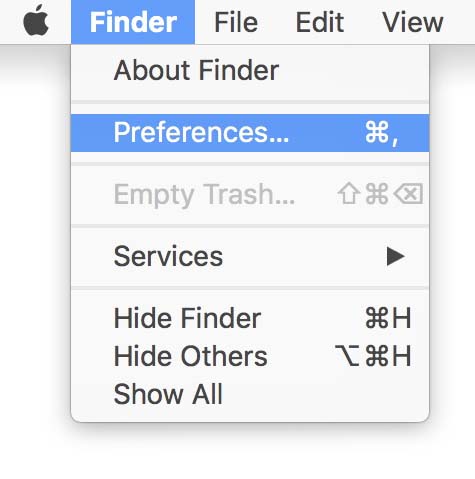
Select the 'Advanced' Icon in the user bar. Tick the checkbox next to 'Show all filename extensions'. This option will now be enabled.

Say you have an image that appears as 'Image' in Finder, when this option is selected it will now display that file as 'Image.jpg' instead. This let's you easily see the file extension of a particular file. It's not required under all circumstances but is an option worth knowing about should you deal with files that don't natively display their extension.
CONCLUSION
When I setup a new computer with macOS for Data Management these Finder options are some of the first that I tweak. I trust these options will serve you well, as they have served me well over the many thousands of terabytes that I have transferred through my computer.
As always, if you have any questions or comments, please reach out below!